Win 7 U x64 OS drive (also boot) out of space - need to migrate to larger SSD - Not sure how.
Hi Gang,
Help Wanted: Wish to learn recommended approach to migrating from an almost full Win 7 Boot SSD.
First let me say there is a wealth of information in this forum and like most things I am discovering that the more I learn the less I know. I have spent the last 90 minutes (my self imposed study maximum) learning about the issues I may face upgrading my "boot" drive and now know that I need help.
Note: I actually think there might be too many "How to guides" - one starts to search for the one which "exactly" matches ones circumstances.
My Problem:
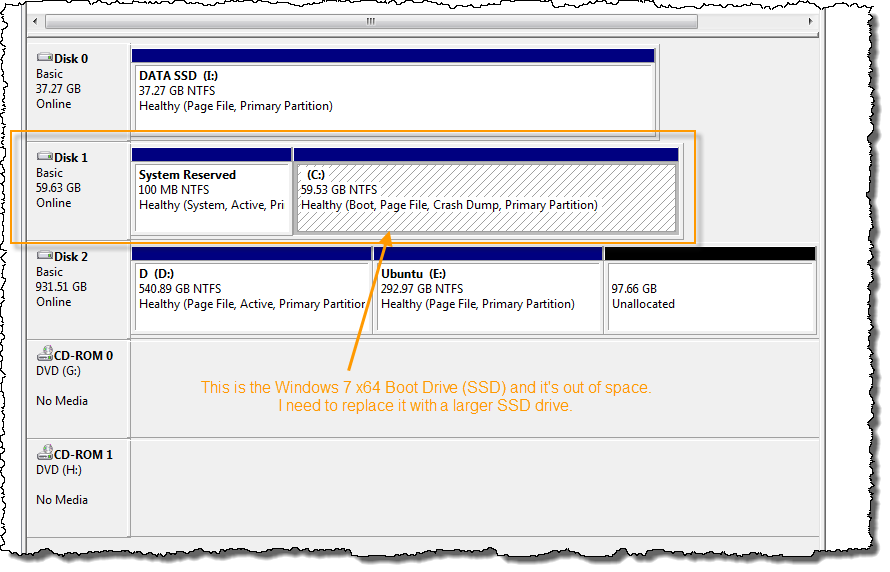
Windows 7 Ultimate x64 is running out of space. When I calculated my needs I failed to account for growth of "WinSxS" folder and other unrecoverable Operating System space consumption. My drive has become dangerously close to "full" and is in urgent need of replacement.
Prior to starting to read this forum my inclination was to buy a larger (115 or 128 GB) SSD and attempt some sort of image transfer. Now I believe the task may not be as simple.
Link to "Disk Management" screen:
www.philusher.com/images/diskmngr.png
This machine is duel boot capable (Win 7 & Ubuntu) but loss of Ubuntu would not be ruinous.
Questions:
These questions effect what I choose to purchase as a replacement.
- Is my understanding correct that if I am going from SSD to SSD I will not encounter partition alignment problems?
- Conversely, should I choose to from a SSD to HDD I will have to allow for partition alignment?
- Do I need Acronis for this? Which version?
- Which "guide" should I follow for my upgrade?
Thank you in advance for your responses.
Cheers ... Phil Usher
- Accedi per poter commentare
Grover,
Excellent - Thank you so much for your response.
I run regular backups via Windows Home Server but as I'll be acquiring TrueImage Home 2011 as part of this process I'll make backing up the entire system with TrueImage Home 2011 my first job.
I'll attach something suitably large via eSata and use it as the storage location for the whole backup image and quite probably as host storage for the clone image of the primary disk.
Clone/Move Win 7 Boot SSD to larger SSD - Confirming the procedure (in detail)
- Install TrueImage Home 2011
- Create TrueImage Home Rescue CD
- Attach a big enough storage device to system (BigStore) to cover needs - in my case via eSata
- Use TrueImage Home 2011 - Perform complete backup of current machine state - Send To BigStore.
- Use TrueImage Home 2011 - Clone Option (Select Manual) Move "as is" to create image of Source-SSD drive - Send to BigStore
- Shut Down System
- Physically disconnect all drives except BigStore (eSata) & CD Drive
- Attach the new Target-SSD drive to the Sata port previously occupied by Source-SSD
- Boot system from the TrueImage Home Rescue CD
- Restore cloned image of Source-SSD (located on BigStore) to Target-SSD currently the only other drive attached.
- When complete shut-down and detach BigStore.
- Boot System from Target-SSD (without any other drives attached).
- Assuming all is well shut-down, re-attach other drives and boot.
- Use Windows 7 - Disk Manager to extend Boot Partition to use unallocated space now present on Target-SSD.
- Done.
I expect there maybe a nomenclature error or two but otherwise I hope this is a pretty accurate representation of the task.
If there is a significant error please speak out.
Thanks again for your quick response.
Cheers ... Phil Usher
- Accedi per poter commentare
At the moment we are not quite on the same path. I will get write some comments and respond a little bit later.
In the meantime, regarding item 1 and 2. These 2 steps are correct, if you plan on installing and using TrueImageHome on a permanent basis. Depending upon your needs and desires, you do NOT have to install TrueImage for this specific chore unless it is something you plan on using later.
Once you get a license and register your software, you will then have access to the Acronis downloads and from your registration page, you can download the "bootable media" option. After downloading, this file can be burnt onto a blank CD and it becomes an alternate TI Rescue CD. From this CD, you can perform backups and restores, etc without the need for TrueImage to be installed on the SD drive.
- Accedi per poter commentare
Quick question. Is the eSata you refer to
a docking station with easy insert/removal of the disk,
or is the docking station a fully enclosed external drive?
- Accedi per poter commentare
It's an external port attached to a SATA port on the Motherboard. However, I'm revising my plan a little - I will now simply install a large SATA drive and remove it when finished.
If it's easier or makes more sense I also have the option of using the drive in an external enclosure via USB but figured that such an approach would only complicate matters.
- Accedi per poter commentare
TrueImage provides two methods to create duplicate disks. Both create the same finished product.
Option 1:There is the Acronis "clone" option which copies/transfers an image/copy of an existing disk directly onto a new disk and produces an second identical disk. (The clone can be made larger or smaller than the original--depending upon the cloning procedures used).
Option 2 is the Restore/Recover a prior backup either as a Disk Restore (no user resizing but all partitions resized proportionately by software); or each individual partition can be restored and resized as part of the restore procedure.
What I am suggesting for you is the Cloning option after a prior full disk backup should something go haywire with your source disk. This goal of creating a duplicate disk could be accomplished in TrueImageHome via several methods so this is not the only possible method.
I will begin on the basis that you have a TI Rescue CD. The new larger disk is to be blank--unallocated. Formatting and partitioning not necessary.
--------------------------------------------------------------
1. Shut down Windows.
2. Boot from the a 2011 TI Rescue CD.
3. Perform complete backup of current machine state (Checkmark disk as to what is to be backed up). also, be absolutely certain to choose "validate" backup as part of the backup options- Send backup To BigStore.
http://forum.acronis.com/sites/default/files/forum/2009/12/7027/Disk-op…
4. Shutdown following backup.
5. Attach new blank larger SSD or SATA to same connector as original.
6. Locate Source SSD to an alternate location--perhaps eSata or internal or etc.
7. Boot from the TrueImage Home Rescue CD.
8. Under Tools & Utilities, Click on the "Clone Disk" option.
a. Select Manual and Click "Next"
b. Source Disk is the header: Select your source disk (the smaller SD) (also note disk # on selected disk). Use disk characteristics to choose the correct disk. Click "Next"
c. Target disk is the header: Select your target disk (the blank larger disk) (also note disk # on selected disk). Use disk size and characteristics to choose correct disk. Click "Next"
d. Move Method: Select the "AS IS" option and click "Next"
e. This is the last screen which has the "Proceed" option in lower right corner. What you can expect to see on this screen is ---
Summary Screen header
Source Disk #=X: Verify disk # is correctly matched (#8B)
Target Disk #=Y: Verify disk # is correctly matched (#8C)
Middle diagram #1: A rectangular diagram showing the Target disk in its current blank status unallocated status.
Lower diagram #2: The target SD partitioned as it will appear after cloning procedure is completed.
9. Summary screen:
a. If data not correct, click "Cancel" and redo.
b. If data appears correct, click the "Proceed" button and the cloning will begin and it becomes too late to cancel.
10. When cloning complete. A success window should appear.
11. Shutdown.
12. Detach any drives except for the new larger SD
13. Boot for the first time into Windows-7 and open the Windows Disk Management tool. The unallocated space is expected to be adjacent to the partition being expanded--according to your attachment in your initial posting.
Right click on the drive C and click on the "extend volume wizard". This new window will display the expected changes. Confirm the default values shown but should will be correct to expand the C drive into all the unallocated space. Respond to the screen prompts until the fullly resized C partition is displayed.
14. Reboot a few times to make sure all is well.
15. Perform a new full disk backup of your new larger SD disk.
16. Shutdown and Attach any remaining disks.
Note:
Is is possible and recommended that you practice the cloning procedure as many times as you wish until you feel comfortable with the procedures. When practicing, perform the various settings and selections until you get to summary screen. When practicing , click the cancel button to stop or start over. When booted into the Rescue CD, Do NOT use drive letters for decisions. Use disk size and characteristics to make your decisions.
- Accedi per poter commentare
Grover,
I should have the replacement drive(s) soon (probably tomorrow) and will post a message about my results.
The detailed instruction set is most helpful.
Thank you for your time and effort.
Cheers ... Phil Usher
- Accedi per poter commentare
Closure: Success.
I thought I would post an update on the result of my upgrade process. As a quick reminder the problem I faced was that my Windows 7 Ultimate x64 boot drive (64GB SSD) was running out of space leading to all sorts of performance problems.
Following (mostly) the steps laid out above I successfully replaced my 64GB SSD with a 115GB SSD and now have over 50GB of free space - I'll be good for a while and should I run out of space again I'm confident I can repeat the upgrade.
About the upgrade - (Noteworthy comments)
Based on Grover's list above (message #6 in this thread)
- 2011 TI Rescue CD - Rescue CD produced from a trial version of TrueImage will not allow Partition Creation or several other advanced features. I encountered this limitation when I installed a new "BigStore" drive with the intent to perform a complete system backup - such a backup required a target which was already partitioned and active. It's probable than an ISO image of a none trial Rescue CD exists and it's also true that I could have used one of many other tools to partition the new drive but I opted to buy a license for TrueImage 2011 as it's clear it will become a regular tool in my "save the day" box.
- Step 3 - Backup entire system - this can take quite a while and when you add the validation step it takes almost twice as long. In my case this represented ~3.5 hours in total.
- Step 8 - Very clear process - Seems to me the only way this could get screwed up and destroy data is if the user really didn't understand which disks contain what and picked the wrong target. I can imagine that if several disks of same type and size were involved such an error would be more likely - in my case the size differences alone made accidental destruction of source most improbable.
- Step 12 - I didn't disconnect all the drives and boot the machine solely with the new boot drive - I opted to skip this step because one of my SATA connections is hard to reach (at both ends). Failure to perform this step has resulted in my new drive NOT assuming the position of Disk 0 (comes up as Disk 2). I adjusted my BIOS to boot from the correct disk and as best I can tell I haven't suffered any problems. I have not yet attempted to boot Ubuntu and if there is going to be a problem I expect this is where I will discover it.
Thanks again for your help Grover. You made my problem your own and imparted your considerable knowledge comprehensively with care, precision and with a soft and generous touch. You instilled me with the confidence to tackle my problem with a successful conclusion. You are to be commended.
Cheers ... Phil Usher
- Accedi per poter commentare
Phil,
Thank you for the follow-up posting on the results. It is always nice to know that something worked as expected. Regarding the disconnection of other disks (#12), removing the single SATA data connector from the motherboard will suffice to keep Windows from knowing anything about another disk.
Glad it all went smoothly.
Grover
- Accedi per poter commentare
Hi:
First time forum user ...!
I am trying to migrate Win7 Pro 64 bit from a SATA drive to a larger SATA drive. I used Acronis years ago, but before shelling out again, I wanted to make sure it would do the job - I have tried some other software and find that I cannot boot from the new drive, even though the boot file is there as well as all the other stuff (i.e. identical to the old disk).
So, if I understand this post correctly, and taking the backups as a given, am I right in the following simplied procedure? I have 4 SATA drives in total, btw.
1. Purchase the full edition of Acronis True Image 2013 (the trial version doen't appear to let me test what I need, and I assume it's not Disc Director either that I need).
2. Detach drives 2 & 3, install 0 in 1 (i.e. the existing smaller C: drive) and the new (target, larger, C drive) in 0
3. Reboot with the Acronis rescue CD
4. Clone disc 1 to disc 0
5. Detach 1
6. Reboot in Windows
7. Reattach 1, 2 & 3 (i.e. I am assuming that steps 3 to 6 will sort out the booting issue on the new drive).
Power offs etc above omitted for clarity, but I know where they should be!
Is this all correct? I am finding this rather more frustrating than I had anticipated, so would appreciate (a) clarity and (b) good news!
Thanks.
- Accedi per poter commentare
Hi,
Since I first cloned a boot drive I have since done it several more times and you basically have it correctly stated. Here are some clarifications.
* The primary reason for disconnecting all drives but the current boot and it's replacement is to reduce the chance of error. If you're confident that you know which drive is which you can risk skipping this step.
* The reason for detaching all drives but the boot on restart is to establish the boot drive as 0. If you're comfortable with changing the boot drive assignments in the BIOS then this isn't vital. However, if you should later need to reset your bios then the machine will likely not boot properly as it will default to boot from drive 0 and that drive will probably not be your boot drive.
Good luck with your upgrade.
Cheers ... Phil Usher
- Accedi per poter commentare
As Phil has already indicated, your procedures "should" work but I would add the following.
1. Are you using a dual boot system? If yes, will your system currently boot if only the old ssd is attached?
2. Before you do any of what you have outlined, have you tried using your (or others) Windows 7 64 bit Recovery CD which can be made from your computer or other Win7-64 bit computer? This option to make is found in the Start/Programs/Maintenance folder; or the Control Panel/Backup folder. Boot the Windows Recovery CD and choose the Startup Repair option. You may need to run this repair several times as the CD only makes one fix per boot. This may make your currrent situation bootable without any further work.
3. Even if you proceed as outlined, you may still need to use the Windows Recovery CD on the larger SSD (before you reattached the o
ld disks) to become bootable.
4. 2013 does not need to be installed as all of the above could be handled by the licensed Recovery CD iso download which can be downloaded after serial number registration.
5. A safer method would be to create a disk image backup and then restore the disk image as a disk image restore. Using this method, your source disk is not at risk of a user mistake--which can and does happen--even when you are careful--but not careful enough.
6. A dual boot system can make matters more complicated.
- Accedi per poter commentare
Thanks Phil, that's great. I'll get on and upgrade to ATI13, and by the time I get it I will have backuped-up masses of stuff just about everywhere!. Cheers, M
- Accedi per poter commentare
Hi Grover:
Thanks for this.
No, not dual booting - simple Windoze only. Not SSD's either - all HDDs.
Yes, I tried the Win recovery CD yesterday, but it failed to solve the problem, not sure why :-(
Appreciate the other tips as well.
Cheers, M
- Accedi per poter commentare
Michael,
Just a note about the use of the Windows Recovery.
You may need to run it 3-4-5 times as it only fixes 1 thing at a time.
While this may not be a fix, it is not unusual to need to run the CD multiple times before it completes the fix.
You might also be intested in link #3 below. Within that link, look at items #2 and #1--both relative to your situation.
- Accedi per poter commentare
Hi Grover:
Thank, that's great, I will study those documents. Call me old fashioned, but I thought the Win utility would be smarter than just fixing one thing at a time! Ho hum, now I am more educated!
Really appreciate your help on this.
Backups and reformats are still running so I think I'll park this until tomorrow evening (the Missus is out then as well, so I will get a clear run at it!)
Cheers, M
- Accedi per poter commentare